10 Handy Editing Tools In Photoshop For Image Manipulation

Featured Image: iStock/filadendron
Adobe Photoshop has set a gold standard for image editing and manipulation. And there are a number of reasons behind that.
Not least of these is the flexibility that the program offers. With a plethora of editing features and Photoshop AI tools available, Photoshop gives you the power to create endless variations and manipulations.
From the ultra-simple to the several step process, there are multitudes of Photoshop tutorials out there. But each tutorial boils down to mastering the use of certain tools.
Building With The Basics
Adobe Photoshop can be a little overwhelming when you first start using it. That’s probably one of the reasons for the sheer amount of tips, tricks, and tutorials regarding the program.
But once you actually start the process of creating and editing a project, it’s pretty easy to pick it up as you go along.
Photoshop is world renowned for giving designers and artists the ability to manipulate photos and images far beyond the original stock photography. Each of these incredible pieces of art begins with the use of a simple tool, like an AI Photo Generator.
Whatever the case, and whether you’re familiar with these tools or not, these ten editing tools are some of our favorite or most used features in Photoshop.
We’ve also included several links to our favorite video tutorials that go further into depth with each tool. And keep in mind that these tools are often combined in order to achieve a certain effect.
One: Quick Select Tool
This is a natural place to start with, as you’ll likely be using it a lot in your image manipulation projects.
Though there are different ways to select objects or parts of an image (we’ll go into another one next), this is a definite favorite of many designers. Some list it as the best way to actually pinpoint what, exactly, you want to work with.
Since separating objects and backgrounds is a typical action in image manipulation, this is a good tool to get familiar with.

Choose the quick select tool by clicking on the icon of the paintbrush with the dotted line coming from it. Alternatively, you can use the short key Shift W. You may need to press the keys more than once, depending on your version of Photoshop.
Having chosen the quick select, drag or paint over the portions of the image that you want to select, or isolate.
You can adjust the size of the paint brush and the sharpness or softness of the edges to help you make a more accurate selection. And if there are a lot of fine details, zoom in to make those adjustments.
The quick select isn’t always the most accurate of tools, but it’s a favorite with artists and designers because it provides a way to select a portion with a great deal of speed.
For more detailed information on this tool and how it can be used, check out this tutorial here.
Two: Lasso Selection Tool
This is a freehand selection tool that can be used in a very similar way to the quick select tool we talked about above. However, the Lasso tool offers a few options to help guide your selections.
You can use this tool in Standard Lasso, Polygonal Lasso, or Magnetic Lasso.
For the Standard Lasso, it’s a simple click and drag movement. Continue it all around the edges of the object that you want to select. Make sure not to let go of the mouse button until you’ve reached back around to the beginning of the object.
The Polygonal Lasso, the first of the two secondary options, is helpful to assist you with selecting straight-edged objects.

If you are choosing an object with high contrast to the background, the Magnetic Lasso is a great option. It creates anchor points as you move your mouse. Make sure to connect the last anchor points to complete your selection.
The Lasso in all its variations works best for simple objects against flat backgrounds. It’s a fast and accurate way to make your selection, whether to remove it or to copy it into a new environment.
For a concise and interesting video on using the Lasso selection tool, check this out.
Three: Refine Edge Brush Tool
The two selection tools above work well for projects that don’t need an extensive amount of detail to be included. But what if your project will really suffer without those details?
That’s where using the refine edge brush tool can come in handy.
You can access the refine edge brush under the select and mask tools at the top of the program. It’s been updated for maximum usability and usefulness.

This tool excels at selecting fine details, such as those in very small projects, or things like hair or fur. You can use the tool on the entire object, but it’s easier, and less time consuming, to use a broader tool such as quick select first, and then fill in the details with the refine edge brush.
As you work, use the zoom feature to get close to the little details, and make sure to check the size of the brush in order to get the most accurate selection. You can also choose the edge hardness or softness of the brush tool as you go.
Four: Camera Raw Filter
Photoshop has a ton of different filters to use, with individual adjustments on each one that means you have a whole world of photo manipulation choices before you. Today we will focus on one particular filter, the camera raw filter.
We’re using this one because it fits in well with the next tool as part of a project goal.
To select the camera raw filter for your image, go to filters, and find “camera raw filter” on the drop down menu.

Several options will come up for your photo, such as the clarity, shadow, and highlight. Adjusting these to a more dramatic level highlights the details in your photo, giving it a HD look.
This filter tool works well on its own, but it also is a great step in a double exposure project. We’ll look at another tool that can make sure those projects are successful next.
Five: Double Exposure With Layers
Layers are such a basic part of using Photoshop to create anything that you may not even think of them as a tool. But they definitely help you to get the job done, so they definitely fit the criteria.
You’ll use layers in just about every project. Here, let’s focus on a double exposure project to illustrate how layers are such a useful tool.
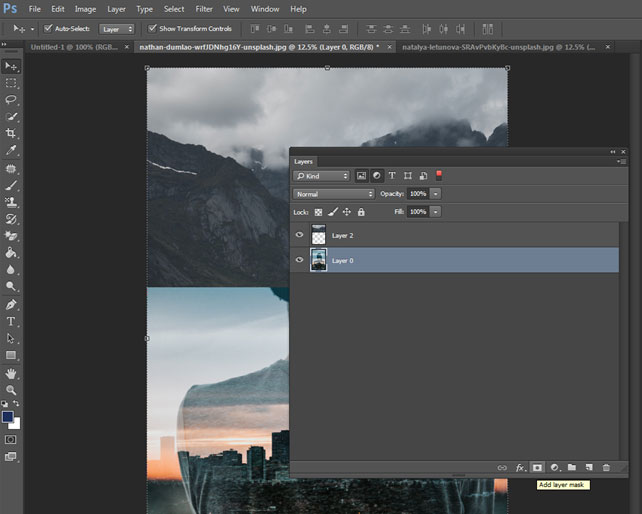
Using the same photo as the previous tool with the camera raw filter, you can make further adjustments to the photo using other filters, such as black and white. Make the first photo your top layer.
Import a second picture, and create it as a layer underneath the first. Change the opacity of the first layer in order to let the second one show through behind.
You can make further adjustments to the photos individually by selecting the layer you want to work on.
For more information on using layers and filters to create a double exposure photo manipulation, take a look at this awesome video tutorial.
Six: Color Highlight With Color Range Tool
Next, let’s turn our attention to another aspect of image manipulation: color adjustment.
It’s common to use tools such as grayscale or black and white to change the overall look of a photo.
But a popular artistic choice right now is color splash photography, in which a black and white photo has one particular color highlighted. This is an easy process to do using Photoshop’s selection tools.
First of all, select the object you want to keep colorized. Next, select color range at the top of the program.
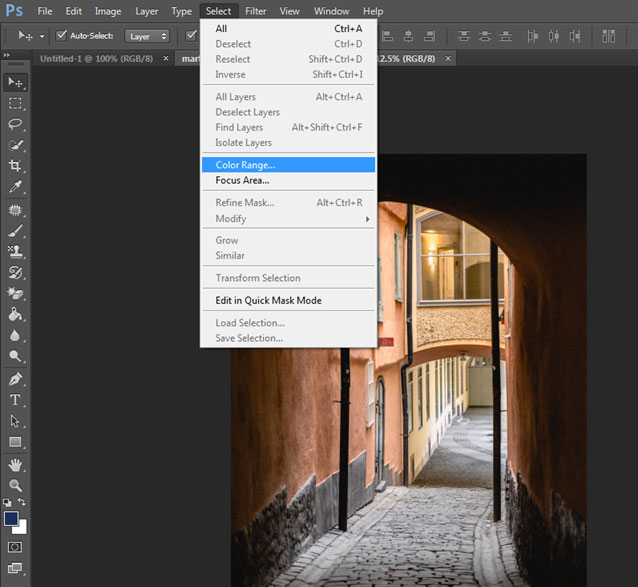
There are some color ranges pre-loaded. But if they’re not true to the color in the photo and they’re not exactly what you want, then use the “sample color” selection tool to choose the color you want to highlight.
You can adjust the sliders for fuzziness and saturation to make sure you get the exact color you want.
After you’ve okayed this selection, then create a second layer in black and white, and apply your chosen selection as a layer mask. If any other colors remain in the photo, then you can use the brush to mask the colors to match the black and white of the rest of the photo.
This tutorial here has the whole project step by step.
Seven: Colorize With Hue/Saturation Adjustment
If you’re interested in color manipulation for your image but you’re not on the color splash photography bandwagon, then using the hue/saturation adjustment tool can walk you through colorizing certain parts of your image while still using the original color palette for the rest of it.
Using the hue-saturation tool allows you to turn any color in the photo into a different color. And you can repeat the steps for individual colors as many times as you want.

First of all, select the area you’re going to work with, and load the selection as a layer mask. Clear out anything that you don’t want to colorize — the tutorial here walks you through it, and in the next tool we’ll discuss another helpful way to use the brush tool in a colorization project.
Select the desaturation icon to work with the colors, and click the “colorize” box.
Here you will have the choice of altering the hue, saturation, and lightness of your selection. Adjust the options until you’ve reached the color you desire.
Eight: Overlay Brush
The brush tool is another fundamental tool in Photoshop, whether you’re painting freehand or using it to fill gradually. But it also can be helpful in conjunction with layer masks to further define the edges of your selections — giving you greater accuracy with things like colorizing.
To start with, select your brush tool, whether from the toolbar or by hitting B for brush.
If you use your brush in normal mode, it will function as a paint brush, and brush over anything you click on. So instead, at the top where it gives you the “normal” mode option, use the drop down menu to select “overlay.”

Choose the color you want to highlight. In this example, which is part of a colorization project, we see only light and dark colors. Choosing white for the overlay means that the brush will change the colors that already match white. It won’t change black or darker colors.
This is a helpful tool for further defining details for a colorization project, giving you increased accuracy. For the complete tutorial, watch it here.
Nine: Content Aware Fill
A fill is another common option that you may not even think of as a tool. You can use fills for all sorts of things, such as backgrounds or objects. You can even fill a background with a pattern taken directly from another object.
Where fills come especially in handy for image manipulation, though, are in using the “content aware” setting.
Basically, a content aware fill means that you can select a portion of your photo that you want to remove, and then the program will automatically fill in the gap using information from its surroundings. It’s essentially like erasing that part of the photo as though it never existed.

This tool isn’t always perfect from the first usage, of course. Sometimes it takes a little refining — or even a lot, depending on the complexity of the background that is giving the fill its information.
But if there’s an object in your photo that just simply has to go, this tool is a great starting point. You can also remove backgrounds to cleanly cut out subjects.
To watch the dog in the photo above disappear, watch the tutorial here.
Ten: Duplicate Tool
This last tool is an easy one but in very common usage for image manipulation projects. There are different ways to do it, too, many of which are detailed in this tutorial.
But we’ll focus on a simple and easy one, which even just requires a hot key.
To duplicate an object, simply select the object you want to work with using one of the selection tools we discussed above. Then hold down the alt or object key, and drag the selection with your mouse. The object will automatically duplicate.

If you hold down the shift key at the same time, the object will duplicate in a straight line, giving you a super easy way to populate your image design.
Using Photoshop For Any Project
Some level of image manipulation is required for almost every digital design or art project. Whether you’re creating a logo, compiling a poster, or designing an art installation, a program like Photoshop is one of the best choices for turning your artistic vision into a real piece, especially when learning how to make pixel art.
While Adobe Photoshop is a powerful leader in this space, many designers also explore other photo editing software options to find tools that best fit their workflow and project needs.
Photoshop is unparalleled when it comes to giving its users a wide variety of editing options. Though it takes time and effort to learn the best ways to use the tools you’ve got, in the end, it’s definitely worth it.